Your finger hits the keys a dozen times in a row: Boom. Boom. Boom. Finally you hit it – the bass drum sample perfect for your latest music production. Then you move on to the snare, cymbals, crashes…
You might not know why some samples sound right and others sound wrong, but something in your ear training experience tells you that the first bass drum sample was too low or was too short. Without realizing it, your ears were listening for frequency and timbre.
What is Frequency?
Technically frequency is the number of cycles per unit of time, which we measure in Hertz (Hz).
The human ear can hear from 20 Hz to 20 KHz. Want to learn how to apply ear training to frequency? Then read Introduction to Frequency Training for the fundamentals of frequency and ear training.
Check out this quick tutorial on frequency and sound waves:
Interested in specific drum frequencies? Then you want to read Percussion Frequencies Part 1 – Drums and Percussion Frequencies Part 2 – Cymbals. Mastering engineer Fotios Koulakos gives a simple step-by-step tutorial on the basics of drums, cymbals, and frequency. You can find out about the fundamental frequencies of drums, what the frequency range of drums are, the audio frequencies of cymbals, along with advice on how to learn audio frequencies for percussion.
What is Timbre?
Have you ever listened to the sound of an orchestra tuning up? The first violin player stands up and plays an A-440 note. Soon a cacophony starts, with a hundred tuning instruments.
Despite the noise you can distinguish between the different sounds. The cello doesn’t sound like the timpani. The harp is distinguished from the oboe. When it’s time for the brass to tune, you can hear the difference between a trombone and a tube.
The unique tone quality of an instrument is its timbre.
An instrument’s sound envelope, harmonics, pitch, and unique tonal qualities contribute to timbre. For example, a tambourine and a handmade maraca may have similar ‘ADSR’ envelopes (more on these in a second), but a tambourine typically has a higher pitch from its silvery jingles while the gourd shaker has a duller lower sound as the seeds hit the sides.
As you choose different drum samples for your mix, your ear training experience almost instinctively tells you what sounds need to go into the mix and which sounds don’t work. By learning how to identify why the sound’s timbre and frequency do or do not work, you will be able to move past instinct and make choices based on knowledge and experience.
ADSR envelopes
When you mix any instrument, including percussion, you want to pay attention to the sound envelope of the instrument. This is the shape of how its volume varies over time for a note:
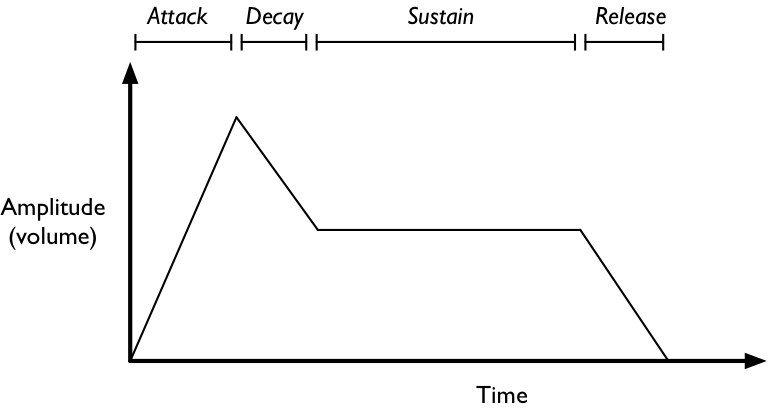
An example ADSR (Attack, Decay, Sustain, Release) Envelope
In simple terms, you want to ask yourself if the note works in gradually (like most synth string patches), is percussive (has a quick ‘attack’), if the note holds the primary pitch (long ‘sustain’) but then cuts off quickly (fast ‘release’), if it takes too long too taper out (long ‘release’), etc.
Knowing the basics of sound envelopes is essential when producing music. Most DAWs will allow you to tweak the ADSR, and advanced synthesizers within programs like Logic give you free reign to change the ADSR of any sound, and even affect other parameters with an envelope.

Logic Synthesizer Controls (including ADSR)
You can learn more about sound envelopes here: Sound Envelopes
Test Your Ears on Percussion Mixing
I am currently in the process of revamping the grand finale of Libertaria: The Virtual Opera, a sci-fi animated opera. The original film score involves over an hour of original music, both vocal and instrumental music mixed in my studio. The music jumps between styles, including jazz, rock, electronica, and classical music.
The finale Rebellion was slightly inspired by a Trans-Siberian Orchestra concert I went to in December. I thought TSO-like hits would work great with the explosive destruction of the genetics factory in the final scene. I wanted a short percussive attack that would provide support but not overtake the hits.
I used my aural skills to choose a drum sound that has an attack and release that work with the big hits. Listening for an instrument’s sound envelope is only one aspect of timbre. You can also listen for harmonics and overall tone color.
While this is a work in progress, you can clearly hear that how the drum set plays an important role in building excitement and keeping rhythm with the strings. Listen to this rough-mix instrumental excerpt of Rebellion from Libertaria and focus on the various percussion sounds:
The drum kit in this case is a basic live rock kit, which gives some rhythmic definition, avoiding muddiness that a lower bass drum frequency would give. The final version of Rebellion will be significantly stripped down once vocals and choir are added to the mix. When I compose I typically start with full instrumentation then start stripping down to the minimum amount of music that has the same effect. This rough mix still has the full musical texture.

Original Drum Set Frequency Analysis
Test Your Frequency and Timbre Ear Training Skills
Now listen to the following three examples. Use your ear training skills to hear the differences in drum frequency and timbre.
Ask yourself:
- What is different about this drum kit, specifically the bass drum hits?
- Does this kit work? Why or why not?
- What role does frequency play in this sample, if any?
- What role does timbre play in this sample, if any?
You might like a different kit for the mix. Sometimes sample choice is a matter of taste. However, you want to listen for samples that are too muddy, high-pitched, compete with other instruments, and don’t work in the track. Make notes on a piece of paper as you listen. Think about musicality, timbre, and frequency.
COMPOSER TIP: When producing the final mix, I typically split the drums to separate tracks to allow for some spatial relationships through panning and EQ specific to the snare drum, cymbals, toms, and bass drum frequencies. For the rough mix, the drums typically sit on the same track to save CPU power, like the examples in this article.
Drum Kit Breakdown
What did you hear in the first example? The bass drum frequency is lower than the original bass drum. Listen to the original sample again for a comparison. Not only is the bass drum too low, the cymbal frequency is high and “tinny”, making for an awkward combination of timbres and sounds.
In addition, the bass drum’s release is too long, causing notes to run into each other. The original drumbeat had a quick attack and release time. The bass drum adds muddiness and is not a good choice for this particular mix.
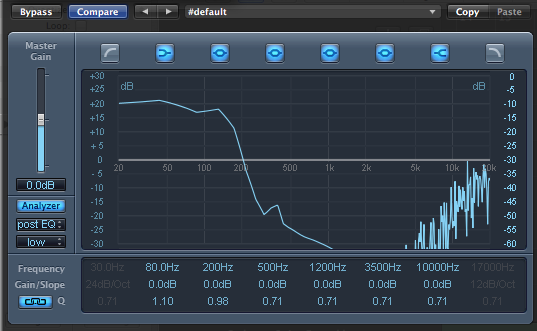
Drum Kit 1 Frequency Analysis
You can see in the frequency analysis above that both the low drum frequencies and the high drum frequencies in this example are more extreme than in the original sample.
Original Drum Set Frequency AnalysisDrum Kit 1 Frequency AnalysisWhat did you hear in the second kit example? Try to hear the percussion frequencies and the approximate ADSR envelope of each part of the drum kit. In this example, the bass drum isn’t too bad, but the cymbal sound doesn’t always work because it is a shorter high-hat sound with a quick attack and release, not the full deep crash needed for the orchestra hits. Even later in the excerpt the cymbal doesn’t work as well as the original sample.
In the third kit example, the bass drum is slightly higher in pitch. The higher bass drum frequency means it sticks out a little too much and plays less of a supporting role.
Train Your Ear to Hear Percussion Frequencies
Sometimes the difference between sounds can be dramatic.
For example, you can choose drum kits that have entirely different timbres. A good example would be a kit sampled from a live performer compared to an electronic drum kit. Other times, frequency can make a difference – high pitch versus low pitch. Just like a live recording, you want to start with the best possible initial sample for your mix. Sure, you could take any drum kit and tweak it to work better, but if the overall sound is totally wrong to begin with, it won’t help your mix.
Take time to test the different drum kits in your DAW.
You might think it’s a waste of time to listen to 100 different bass drum samples… but do it, and you’ll gain a better appreciation of the variety of sounds percussion can introduce to your mixes. Over time you will develop the ear training skills to discern what your mix needs quickly and directly.
Next time you are mixing down music, listen for drum kit timbre and percussion frequency. Listen for the ADSR envelope, pitch, and tone quality when you choose your instruments. Continue to tweak the mix and pay careful attention to what your ears are telling you until you reach the perfect mix of percussion frequencies.
Share your drum kit mixing tips in the comments below. Did we miss something? Let us know! We’d love to hear from you.