Enjoy singing your favorite tune at the top of your lungs in the privacy of your own car? Having such wonderful self-confidence in a less-than-stellar vocal performance can be exhilarating, but developing accurate pitch is an essential part of ear training. You can practice pitch by recording your voice. Recording your voice allows you to be the Simon Cowell of your own personal American Idol.
![]()
![]()
You can easily record your voice with Audacity, a free sound editor available at Sourceforge. Audacity is currently available in two flavors, the original Audacity ‘1.2.6a’ and the new beta version Audacity ‘1.3.12 (Beta)’. Audacity is available for both Macs and PCs, as well as other operating systems like GNU/Linux. To record your voice or an instrument in Audacity, you will need:
- a computer
- a microphone (a built-in microphone or a USB mic will do)
- and preferably a pair of headphones
Record Your Voice

The main controls in Audacity: Pause, Play, Stop, Back, Forward and Record.
After downloading Audacity to your computer, you want to select File/New to create a new project. To add a new track go to Tracks/Add New/Audio Track. Audacity will add a blank track to your project. To record, simply push the red Record button. Audacity will begin recording. Hit the square Stop button to stop the recording. If you do not like the recording, you can select the track and hit Delete. If you are happy with your recording, save your project under File/Save Project As.
Listen
Now comes the potentially painful part – judging your vocal performance. Does your pitch slide up and down? Are you slightly sharp or flat? Do you find that your voice “breaks” at a certain point in the scale? Don’t worry at this point about the actual quality of your voice. What you want to listen for is overall pitch. Detect your mistakes and record different takes of your singing. Compare different takes. You might even want to record a performance on an instrument as a reference.
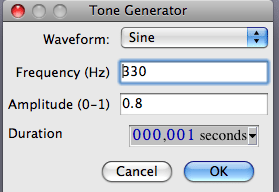
Using the Tone Generator

Generate a tone for comparison
Audacity includes a tone generator which creates sounds from scratch. You can match your pitch against a generated tone. Go to the Generate menu and select Tone. Choose ‘Sine’ out of the Waveform menu and input the Frequency. You can find the frequency of a specific pitch here.

Enter the intended frequency of the note you sang
Audacity will place that tone in a new empty waveform track. You can check your own pitch against that of the tone generator. Try just a few tones at a time, and check your own performance against the generated tones. If you want to practice away from your computer, you can easily create an MP3 for your iPod by selecting File/Export/MP3.

The generated tone track alongside our original stereo vocal track.
Advanced Analysis
Once you’re comfortable with analyzing your performances by their frequencies, try some of Audacity’s more advanced forms of analysis.
In the example, a piano plays the notes C, D, and E. To analyze the track, double click the track, then select Analyze/Plot Spectrum. Make sure the Algorithm box states ‘Enhanced Autocorrelation’. This graph shows you which pitches are the loudest in the recording. How can that help? Compare the vocal analysis with the piano analysis.

Frequency analysis of piano track. Each peak represents a note.
While the piano analysis clearly shows that the notes C, D, and E were the loudest and only pitches played, the vocal analysis shows that the overall recording also had an F#, an A, and did not remain strong on the main pitches of C, D, and E:

Frequency analysis of vocal track. You can see the off pitches and extra notes.
In other words, our vocalist could not stay on pitch and most likely was slightly sharp. Ouch! You can also use this analysis to check your voice against generated tones.
Besides using Audacity for ear training and analyzing pitch, Audacity can be used for audio editing, music production, and exporting MP3s. For such a great price (free!), every music lover should have audacious Audacity in their audio arsenal.
To learn more about the frequencies in sound, try our Frequency Fundamentals series.
Have any questions about using Audacity for analysis, or want to share your tips and tricks? Please leave a note in the comments below!