
I know what you’re thinking: “Crazy, easy, weird – that all sounds pretty good. Well hold on there, cowboy! Modal?! Nope. That’s the hard stuff. I mean, aren’t we talking dudes like John Coltrane and Yngwie Malmsteen? What kind of sucker do you think I am? Do you really think that you’re going to scam me into buying your line that modal can be easy?”
Yep. That’s just what I had in mind. What’s more, I’m going to show you how to do it on the piano even if you have never touched a piano before in your life! If you don’t have access to a keyboard, that’s perfectly fine. As long as you can play or sing a major scale, you will easily be able to transfer this exercise onto any instrument.
Lest I turn you off with all those silly attention-getting italics and exclamation! points, let me also confess that I deeply appreciate the countless hours of musical pleasure and satisfaction I’ve experienced with this modal improvisation exercise. It’s time for me to share.
Step 1: Find a piano (or other instrument) now
Let’s start by looking at the piano keyboard:

This pattern of notes repeats up and down (or, you might say, to the right and left) across the whole keyboard. No need to worry about black keys for now: just use them to help you see the pattern.
With your left hand, play a low note, on any white key except C or B: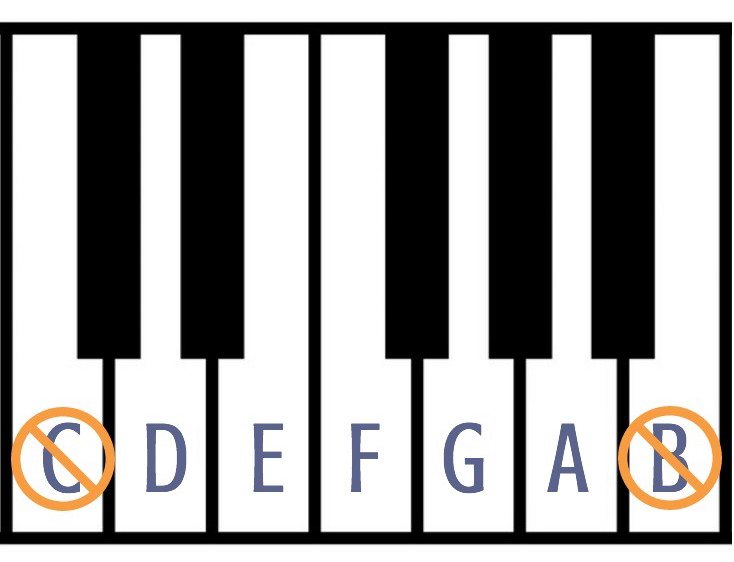
For now, take my word for it. I will explain why in Part 2.
While you are holding that low note with your left hand, use your right hand to play around with the any of the other white keys. (The “no B, no C” restriction only applies to the left hand.) You can repeat the left hand note whenever it fades out.
That’s it. You did it. You just played a modal improvisation on the piano.
Pretty easy? That’s really all you have to do. You can stop reading here and now and jam out till the wee hours of the morning. That’s what I did when I first learned this trick.
So what makes this modal? When you hold the single note with your left hand, it establishes a central tone, known as the tonic. So C is the tonic of C major. But choosing tonics other than C magically rearrange the same pitches into new scales, known as modes. We’ll go deeper on that in Part 2.
Here’s my version:
I’m playing an F with my left hand.
Now to make it cooler, hold down the sustain (damper) pedal while you’re doing it. You can always lift it up if things become too muddy. And when that left-hand note fades away you can always play it again:
If you have a keyboard you can experiment with some fun spacy instrument sounds:
Step 2: Making it sound better
Now don’t worry if your first attempts don’t sound too polished. The more you do it – while you listen and think about what you’re doing – the better it will get.
Here’s a few more tips on how to make it sound better:
Enrich your Drone
No, I am not encouraging you to rob banks with your robotic flying device. In music, a drone is a tone, or group of tones, that sustains for a long period of time under the melody. Certain cultures have whole instruments dedicated to this role – the Hindustani tambura for example.
This is a rich drone, which includes the tonic “D” and the fifth “A” Go ahead, give your left hand a rest and jam along with this video. You can also pick up a melody instrument, but remember to stay with all-natural notes
The left hand takes the role of the drone in this exercise. So far, we’ve only been playing a single note. Now, count five notes up, including the first note:
By the way, these are the notes that the tambura is playing in the video.
You’ll notice that the fifth resonates strongly with the first note (the root, or tonic) and produces a rich, mysterious, three-dimensional sound. That is because this interval of a fifth vibrates according to pure, simple mathematical ratios. In fact, the fifth generates the most fundamental natural principle of musical pitch organization: the Circle of Fifths.
You can add the octave above for even more richness, and even add a little movement, if you’re ready to exercise a bit of coordination. I like to add the ninth sometimes (a fifth above the fifth, if you can make the stretch).
Now your right-hand improvisation has a sonic landscape to play in, rather than a just a single note to bounce off.
Slow Down
Give yourself time to hear the notes, to hear how the notes in your right hand “relate” to the sustained note in the left hand. Do they seem to harmonize? To clash? You’re training your ears to hear levels of tension and release in the intervals between the left-hand bass and the right-hand melody notes.
The more you learn to hear these qualities, the more control you will have about expressing what you’re hearing in your head.
Put on the Handcuffs
Well, not literally. But one of the best ways to improve your improv is through limiting your options – in other words, freedom through constraints. For example, try focusing your right hand on just three notes for a period of time before moving to the next three notes. And while on those three notes, you might want to mess around with just one or two of them for a while before bringing in the next, to build suspense and meaning.
Here’s a three-note improv (G, A, B) over an E drone:
And here’s one where I chain two three-noters together (C, D, E then A, B, C over a G drone):
→ Learn more about Improvisational Freedom through Constraints
The Benefits of Modal Improvisation
Besides being a fun, easy way to create beautiful music, this modal improvisation exercise strips away chord changes and focuses your attention on musical storytelling and other oft-neglected structural elements of your melody. Your ears will become sensitized to the nuances of how tones relate to one another, and you will be much more aware of the relationships between of chords and scales. What are chord progressions anyway but a series of moving drones?
Even so, many people still shy away from modal because the theory seems too complicated. If you’ve looked into it before, you’ve probably seen all those strange Greek names, like “Lydian” or “Locrian”. But once you become immersed in this process of exploration in a relaxed, enjoyable way, a more systematic approach will enhance your ability to apply what you’ve learned to the other music you’re playing. So in Crazy Easy Weird (Modal) Improv Trick, Part 2, we will propose such a simple, hands-on system – and we’ll learn that the Greek names aren’t so complicated after all.
In the meantime, you now know that modal improvisation is nothing to be scared of. Are you still reading? What are you waiting for? Go find your instrument, get your drone on, and have some improvisation fun.
Learn more
Learn more about Improvisation in Chapter 15: Improvisation in the Musicality book.
Read Now For Free!