Though hearing a rhythm in your head or tapping along to the beat comes naturally to many musicians, it can be trickier to understand rhythmic notation and put a beat to paper. Enter Groove Pizza, a simple, interactive tool to help you understand rhythms using a visual grid system that lets you see exactly how the beat is formed. In this episode, we’re giving you a crash course, forming some common beats with Groove Pizza and tweaking them to see how the sound changes!
Listen to the episode:
Subscribe For Future Episodes!
Enjoying the show? Please consider rating and reviewing it!
Links and Resources
Enjoying Musicality Now? Please support the show by rating and reviewing it!
Transcript
In our last episode I was talking with Katie Wardrobe of Midnight Music and she mentioned an online tool that’s a great way to experiment with rhythm patterns called Groove Pizza. I wanted to pick up on this and talk a bit more broadly about the approach it uses: grid notation for rhythm.
One thing that puts a lot of musicians off traditional notation is the rhythm side of things. The idea of each note having a vertical position representing pitch seems sensible enough, and although it’s not as simple as it could be, the pitch side of things doesn’t take too long to get the hang off.
But what makes traditional notation seem so complicated is mostly the rhythm aspect. Every note length has a different symbol and there can be added complications with dots and rests and all kinds of things – which visually don’t make it obvious what the rhythm pattern is. At least until you’ve really mastered the notation and learned to sight-read it quickly.
So for quite some time there’s been an alternative which is particularly popular among electronic musicians who create music using software tools and often don’t have any background in learning traditional notation.
When it comes to putting notes into a tool like Logic, Ableton or Garageband, traditional notation may be available – but the default is what’s called “piano roll” notation. It’s called that because it’s based on the system that old mechanical player pianos used, in which holes or dots on a rolled-up piece of paper indicated which notes to play when.
It’s a really simple system: it’s a grid. The vertical position indicates pitch, semitone by semitone. The horizontal position indicates timing, and so the length of a note is represented by how long the note’s marker is.
This makes it a very natural visual equivalent to the patterns we hear. We’ll have some examples in the show notes to make this clear.
There are definitely limitations to piano roll notation but one area where it excels is rhythm patterns. If you’re programming a drum beat for example it can be incredibly helpful to see it in this grid form because percussion parts are often regular, systematic and repeated – which the grid system is perfect for.
I have to confess: when I first encountered piano roll and grid notation I already knew traditional notation and I thought they were just the “for dummies” version. Something you used because the software required you to, but wasn’t something that “real” musicians would find useful.
I was totally wrong. Spending some time with piano roll and putting rhythms into a grid gave me a whole new perspective on how rhythm works in music and it’s incredibly useful for developing your musicality on the rhythm side of things.
I’m going to talk through a simple example of using Groove Pizza to build up and then experiment with a drum beat. Since it’s quite a visual thing we’re discussing I’ll put screenshots of each rhythm pattern in grid notation in the shownotes. Or you can follow along yourself using Groove Pizza, we’ll have the link to that in the shownotes at musicalitynow.com too.
But I think it will be interesting just to listen along too – because part of why I love grid notation for musicality training is that it helps you build up a mental model of how all the beats and subbeats fit together quite differently to how traditional notation gets you thinking about it.
To me the big difference is this: with traditional notation you naturally think in terms of a sequence of notes. The timing of each note depends on the timing and duration of the notes which have come before. You get a kind of “reset” at the start of each bar where you can see a clear “one”, but for the rest of the bar you need to go note-by-note to know how it all fits together.
With grid notation you instead look at the whole bar at once, or even several bars. And each note can be placed directly in the position it should occupy – or if you’re looking at a pattern, you can see immediately when that note happens – regardless of what notes have come before.
That makes it perfect for understanding patterns like drum beats because if we say the kick drum falls on beats 1 and 3 we can see that immediately. If we want to see what happens if the snare drum hits are delayed by half a beat we can just move them and it’s immediately visually clear what’s going on.
Again I should say: this isn’t stuff you can’t do in traditional notation – it’s just much more visually obvious in grid notation. And that can make it more easy and fun to experiment with, and it builds up a really useful different way of imagining rhythms in your mind and interpreting them with your ears.
So let’s dive in to an example.
With Groove Pizza by default you get a pattern of 16 “slices”. I should mention this tool gets its name from a fun circular representation of your rhythm it shows you too – hence “pizza” and “slice” – but below that you have the standard grid notation and that’s what we’ll be talking about.
With 16 possible note timings you might interpret that as a single bar of 16th notes, or if you slow down the tempo it can be two bars of 8th notes or four bars of quarter-note beats.
We’re going to set the tempo to a slow one, 50 BPM, so that we can play around with 8th note patterns and still have it slow enough to hear what’s going on.
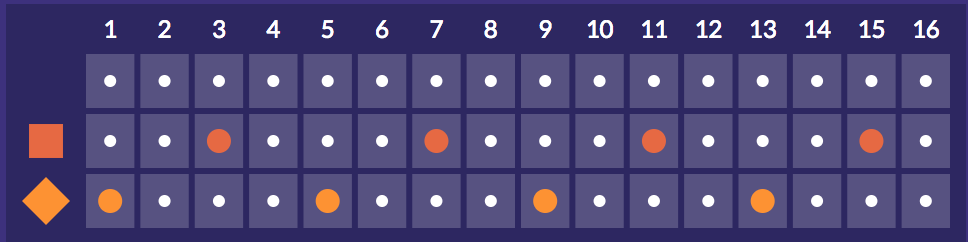
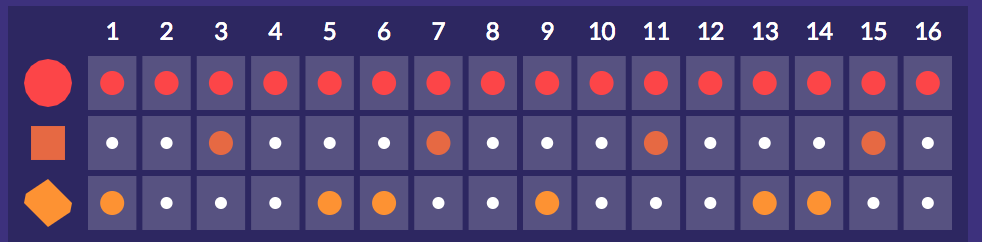
Let’s start out simple with a kick drum on beats 1 and 3 for two bars.
Note: We’re treating the 16 “slices” provided by Groove Pizza as two bars of 8th note subdivisions in 4/4!


You can count that as 1 (2) 3 (4), 1 (2) 3 (4). I’m emphasising the beats where the kick drum falls and still counting the others out loud just so you can hear the 4/4 beat.
Now let’s introduce the snare on 2 and 4 which gives us a pretty standard rock pattern:

One thing I should mention is that this particular tool doesn’t give you control over each note’s volume. So normally we’d be emphasising certain beats here to give a more musical feel but for these examples all the volumes will be the same.
There’s one part missing from our standard rock beat, and that’s our hi-hat playing straight 8ths, meaning it plays 8 8th notes each bar: “1 and 2 and 3 and 4 and”:
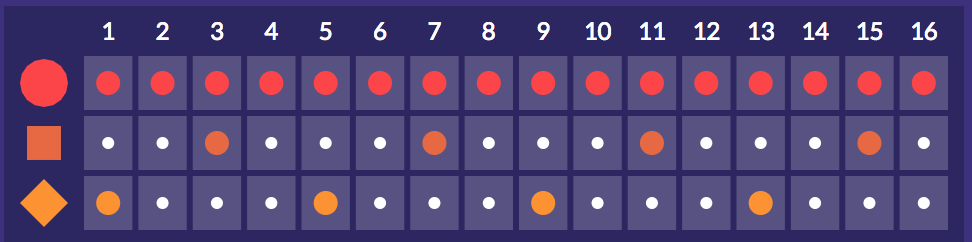

So this is where it gets interesting. In traditional notation this looks pretty clear and sensible, easy enough. We’ll put the image of that notation in the shownotes so you can compare.
But now we can start to play around, and each of our three parts is totally independent of what’s going on in the others.
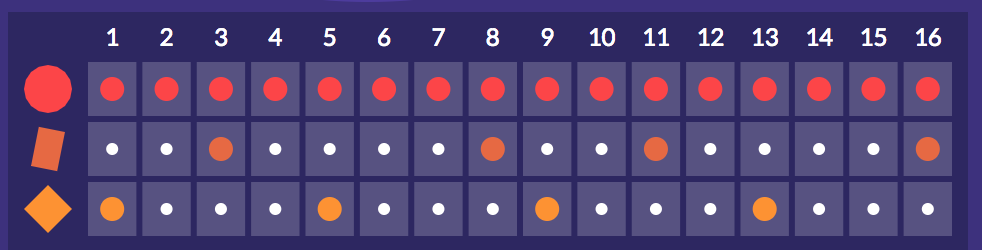
What if we throw in an extra kick drum hit before the 3?
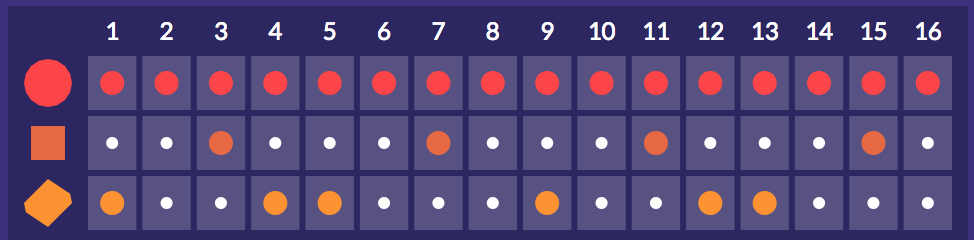

Or an extra kick after the 3?

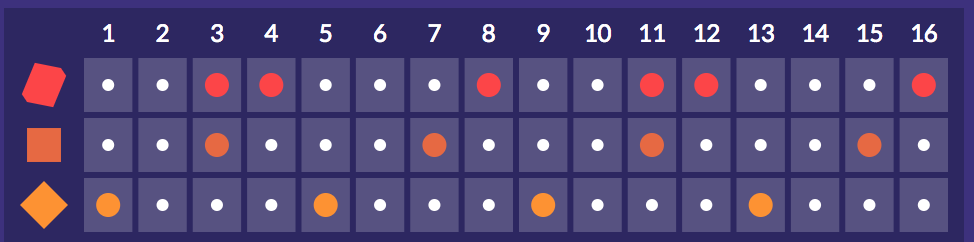
Or we could try delaying the snare hit on 4 half a beat to put it on the “and” of 4 instead:
What if instead of filling with hi-hat 8ths we try just putting a few in to give some of those same off-beat effects without moving the kick and the snare at all?

If you’re familiar with traditional score notation then you can probably imagine listening to this how complicated it could get to write down or try to sight-read these slightly less-regular patterns. And we’re just using 8th notes for now! With sixteenth notes things can really get messy. With grid notation all of these are super simple to create or interpret.
One of my favourite features of Groove Pizza in particular is how it handles swung rhythms: You can actually see the effect of swinging the beat.
I expect you’re familiar with the idea of swung rhythms, where things just sound a bit more fluid, cool and jazzy. But literally what it means is that instead of each beat being split into two equal halves to form its two sub-beats, we split it into one long and one short sub-beat. Instead of “1 and 2 and 3 and 4 and” we get “1 and2 and3 and4 and”.
With Groove Pizza as you increase the swing factor you can actually *see* the impact: every other “slice” gets shifted right a bit, so that you can see that pattern of long-short long-short. This makes it super intuitive to take a pattern like this one we’ve been playing around with:
and understand what’s going on in the swung version:
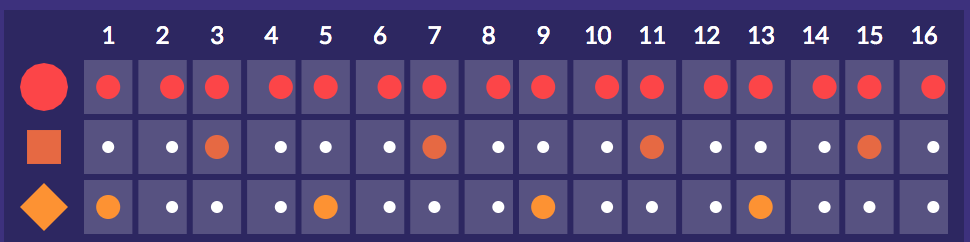

It’s immediately obvious that the kick and snare aren’t affected at all because they’re falling on the beat. But every other one of our 8th-note hi-hat hits are off the beat and so they get delayed a little and create that long-short pattern.
Hopefully you’re starting to get a sense of how grid notation can be interesting, different, and useful!
If it’s new to you then don’t worry, I wouldn’t expect you to fully understand it just from this short description! Especially if you haven’t yet checked out the images in the shownotes. But hopefully it does inspire you to go and play around with a tool like Groove Pizza, GarageBand or another music sequencer.
Piano roll and grid notation are not just an overly-simplified way of entering music into a computer. They’re a really valuable alternative representation of how rhythmic patterns are constructed, and once you internalise this way of thinking about rhythm you’re going to have a much better ability to recognise and understand the rhythms you hear, as well as more easily creating your own interesting rhythms. So if you’re looking for a new way to develop your ear for rhythm: give grid notation a try!
Subscribe For Future Episodes!
Enjoying the show? Please consider rating and reviewing it!